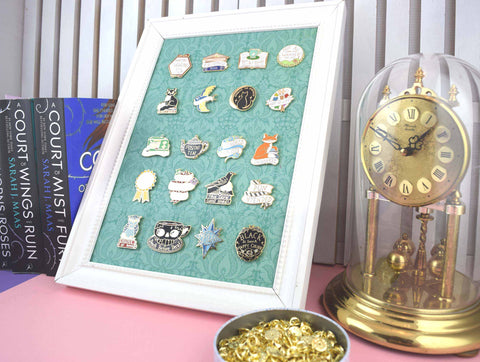
People often ask us for the best way to display our enamel lapel pins, so we thought we would make a blog on just that – how to create a display for your enamel pins!
You can easily whip one up with items you may already have just lying around the house: That old frame you picked up from your local charity shop, cardboard from that box of books you have just unpacked, and some scrap paper from those lock down craft projects you may have started!
This project can be as simple and/or creative as you like, so let us show you just how easy it can be to make a display for all of your enamel lapel pins!

The ingredients:
- An old (or new) picture or photo frame.
- Cardboard, foam core or core-flute for the backing board.
- Crafty paper, coloured card or fabric.
- Ruler and pencil.
- Cutting mat or Chopping board
- Scissors or box cutter/Stanley Knife
- Double sided tape, Glue stick or a Spray adhesive
The recipe:
Use the back of your frame as a template to measure your backing board and coloured card. You can usually trace this backing. If not, measure the internal dimensions with your ruler, making sure to measure inside the lip of your frame.

Mark this out on your backing board with a pencil.
Then, cut along the line with either scissors or a box cutter/Stanley knife. Make sure you have your cutting mat or board underneath. Make sure to keep your fingers out of the way when using a box cutter or Stanley knife! Handy Tip… Use the ruler as a guide for the blade.

You can repeat this process for the coloured card, ensuring that you cut accurately to the backing board.

Test both the card and board against the space you have in the frame. You can trim accordingly until you have a nice fit!
Use your double-sided tape or glue stick to secure your paper to the backing board. You could also use a spray adhesive (in a well-ventilated area) if you need something a little stronger, especially if you decide to use fabric.

Secure the backing into the frame. Some frames will have the fold down the tabs which will hold the backing card in place. Make sure the pretty side faces out of course!

Now you can pop your pins onto the board in whatever design takes your fancy!

Ta Da! Now you can pick a place to display your pin collections with pride! Don't forget: Find a cute little container to store your pin backs in to keep them close by in case you want to wear one of the pins.

Extra Handy Display Tips:
Highlight all your collections! Old picture frames can be displayed on a desk, bookshelf or hung on the wall. Coordinate your colours to match your home or favourite outfit. You could even take a small frame to the office but be careful with the sweary ones! LOL!
Check out My Video of the full process here!
@jublyumph Will you try and make this? (Ps. find more detailed instr on my blog) #enamelpins #jublyumph #holidayproject #aussieteacher #aussiemum #crafttime ♬ original sound - Tasha | Artist & Pin Maker
The Jubly Team would LOVE to see some of the designs you have come up with! You can share with us on Instagram at @jublyumph .


3 comments
I took an old bulletin board/cork board and covered it with fabric then draped lace and let it slightly hang on levels one below the other – this allowed me to take my decorative paperclips and planner charms and hang them/or clip them to the lace holes which gave me versatility in the types of items I could place on the board.
I have also used a canvas and just left it plain, so the pin are shown to their best
A similar suggestion for the lazy among us (aka me) – I just bought a canvas and an ornamental easel from a local craft store and display my pins on that. I could dress it up by stretching fabric across it or something, but I like letting the pins be the focus point. Has the added benefit of being easy to update as my pin collection expands – just buy a bigger canvas and get pinning!
Leave a comment